Estimates
An estimate is an itemized price you send a customer before the work starts. You build it from line items and send it by email or text. The customer reads it on a private page.
Everything happens on the Estimates page. The customer does not approve an estimate online. They reply to you, and you or your team record the answer. From there the path is estimate, then job, then invoice.
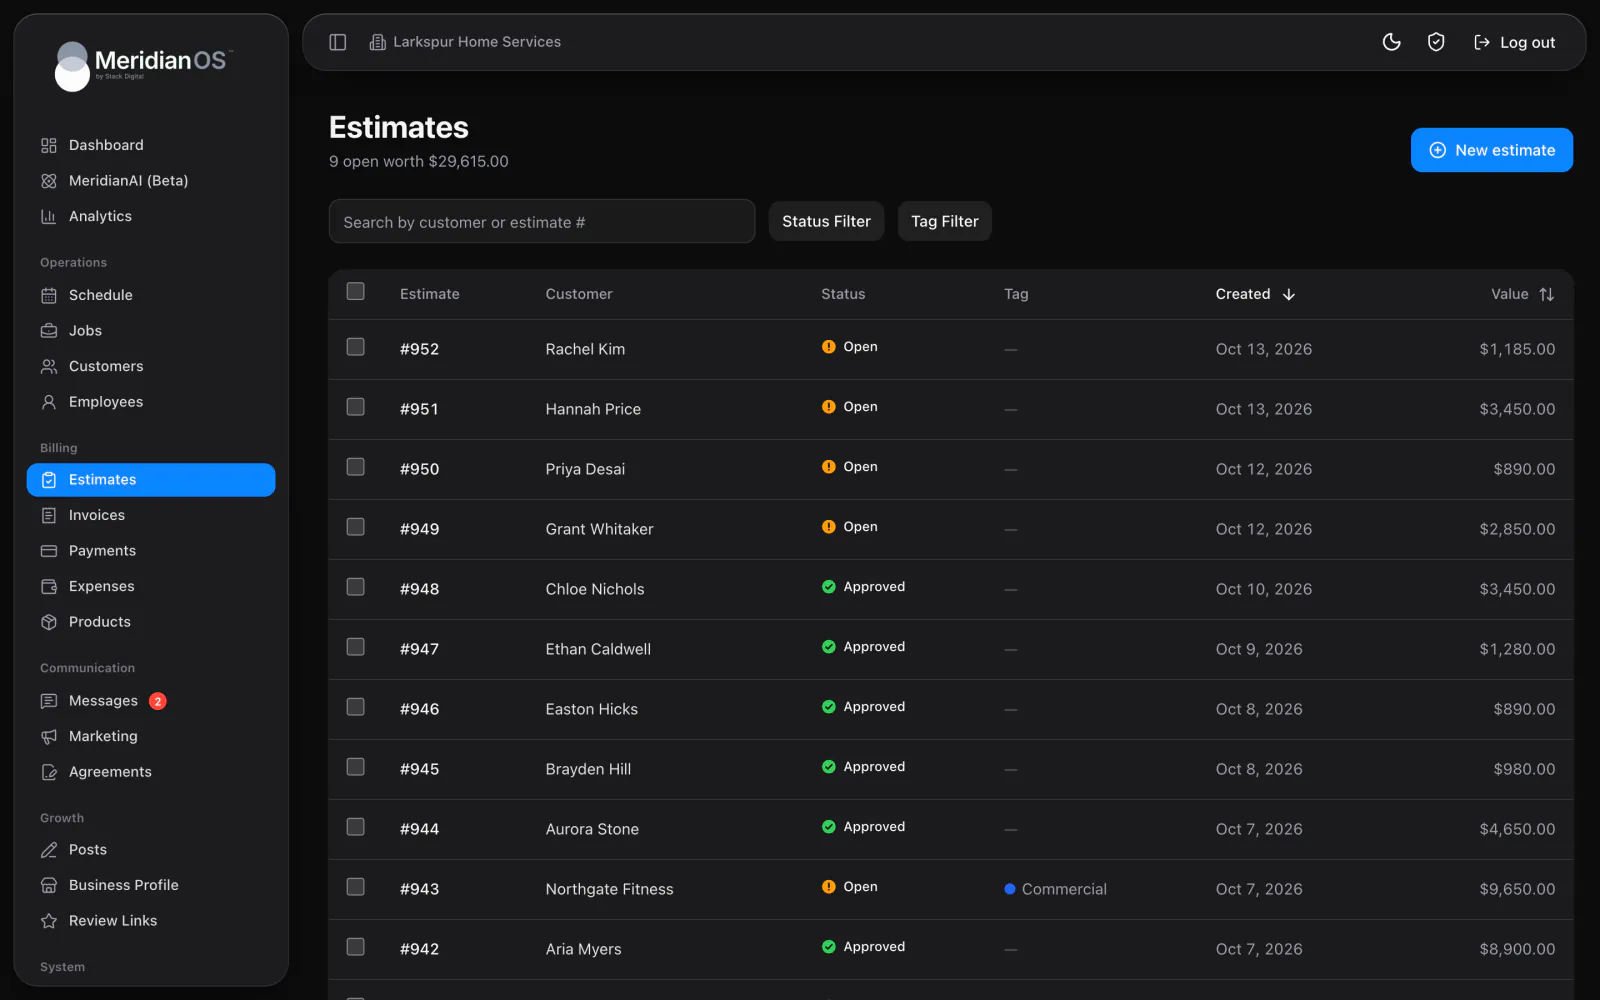
The Estimates list
The Estimates page lists your estimates, 50 per page. Under the page title, a live subtitle shows how many estimates are open and what they are worth.
| Tool | What it does |
|---|---|
| Search | Search by customer or estimate # finds an estimate by customer or estimate number. |
| Status filter | Shows All, Draft, Open, Approved or Declined estimates. |
| Tag filter | Narrows the list by tag. |
| Sort | Orders the list by Created or Value. |
Each row shows the estimate, the customer, the status, the tag, the created date and the value. The customer name links to the customer record.
To change several estimates at once, select their rows. You can then use Change status to..., Add tag..., Clear tags or delete. Each bulk action asks you to confirm first.
Create an estimate
- Select New estimate.
- Pick the customer. The estimate starts with that customer's tags.
- Add a service address if the work is at a different location. This is optional.
- Add line items. Add from products fills a line with the name, description and price of a saved product, and you can edit each of them for this estimate.
- Save the estimate. A new estimate starts as Open.
Each line item has a name, a whole-number quantity, a unit price and an optional formatted description. The description prints on the PDF and on the customer's page. The product catalog is covered in Expenses, products and services.
Estimates have no tax, discount or deposit fields. The estimate total comes from the line items alone.
The estimate page
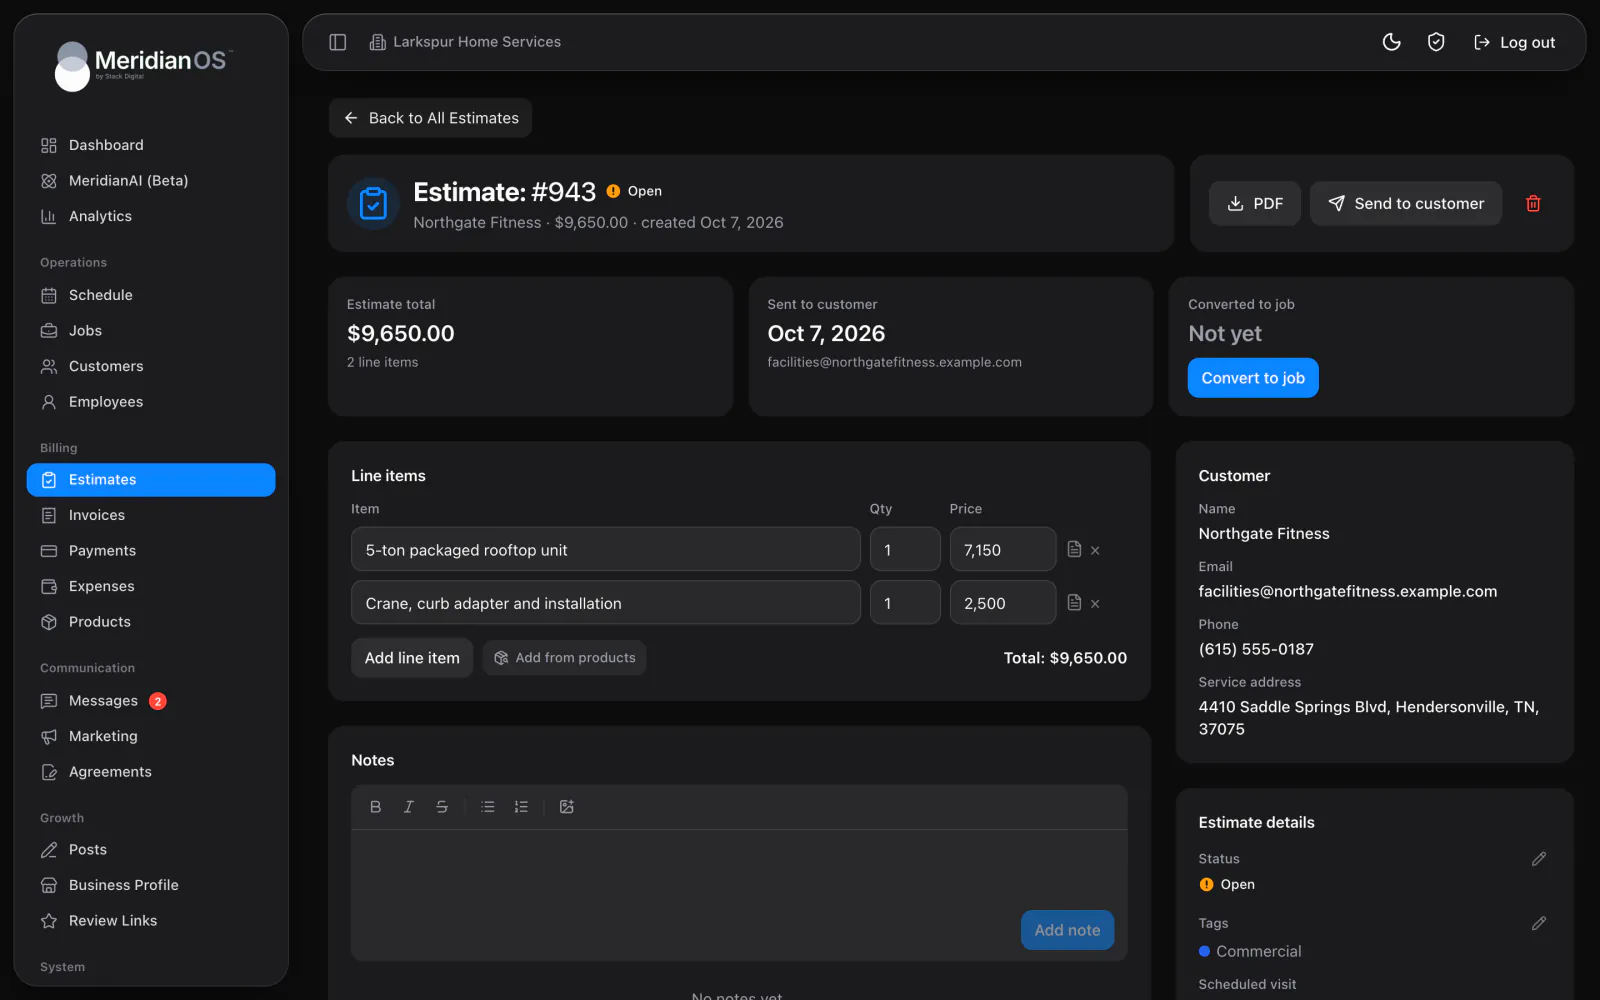
Open an estimate from the list to see its own page.
| Part of the page | What it shows |
|---|---|
| Buttons | PDF, Send to customer and delete. Deleting asks you to confirm. |
| Estimate total | The total, with the number of line items. |
| Sent to customer | The date the estimate was sent, or Not sent yet. |
| Converted to job | A link to the job with its status, or a Convert to job button. |
| Line items | The line item editor. Select Save changes after you edit. |
| Notes | An internal notes feed that only your team sees. |
| Customer card | The customer's email, a phone number you can tap to call, and the service address linked to maps. |
| Estimate details | Status (which you can change), Tags, Scheduled visit, Job, Last sent to customer and Estimate link. |
Send an estimate
- Open the estimate and select Send to customer.
- Choose Email, Text message or both.
- Send it.
| Channel | What the customer receives |
|---|---|
| The subject names the estimate number and your company. The body has an itemized table, the Estimated total and a View Estimate button. The estimate PDF is attached. | |
| Text message | A short text with your company name, the estimate number, the total and a link to the estimate. The wording is a template you can edit. |
- Sending stamps the sent date. If the estimate was a Draft, it moves to Open.
- Emails and texts carry a short link to the estimate page, so the message stays short.
- Text message appears only when texting is available on your site. See Text messaging.
- Each estimate email is recorded in the Email Log with the source Estimate.
- Estimate emails have their own switch in Settings and are on by default. See Settings.
What the customer sees
The link opens a private page that search engines do not index. It shows your company name, the estimate number, Prepared for, the date, each line item with its description, the Estimated total and a Download PDF button.
The page follows the status you set. An approved estimate shows a thank-you message saying it has been approved. An estimate that is no longer active says so and invites the customer to reach out for an updated one.
The customer's page has no approve or decline button, no signature and no deposit payment. It asks the customer to reply to the message the link came in. You or your team record the approval.
Record the customer's answer
When the customer replies, record the answer on the estimate. There are two ways to record a yes.
- Select Convert to job. This marks the estimate Approved and creates the job in one step.
- Change Status to Approved by hand in Estimate details.
If the customer says no, change Status to Declined.
Convert an estimate to a job
- Open the estimate.
- Select Convert to job on the Converted to job card.
- Confirm.
MeridianOS™ marks the estimate Approved and creates a job with:
- The same customer, address and tags.
- The estimate total, plus a description built from the line item names.
The job starts as needs scheduling. The Converted to job card then links to the job and shows its status.
The estimate's line items are not copied onto the job as line items. The job carries the total and the description.
From estimate to invoice
An estimate cannot be turned straight into an invoice. The path is estimate, then job, then invoice.
- Convert the estimate to a job.
- Open the job and select Create invoice. The invoice is built from the job, payment terms included.
Tags follow the work from the customer to the estimate, the job and the invoice. See Jobs and Invoices for the next steps.
Related
- Jobs and recurring jobsHow to find, create and manage jobs, what the job page holds, and how recurring jobs, their billing and tags work.
- InvoicesCreate and send invoices, set terms, record payments, and see what reminders and recurring billing do on their own.
- CustomersFind, add and edit customers, read a customer page, and use tags, addresses, notes, texting and the notification switch.
- Expenses, products and servicesEnter monthly expenses by category for your profit numbers, and keep a catalog of products and services for line items.
- Estimates overviewItemized estimates that turn into a scheduled job in one click.
Updated November 10, 2026.